Code Editor
Overview
The GLASS Studio Code Editor is a simple built-in text editor that supports the full suite of GLASS keywords and operators.
The Code Editor includes essential features for writing and editing your GLASS code, including syntax highlighting, code formatting, and code compilation.
Components
-
Toolbar
Provides access to the main menu, zoom controls, error notifications, and links to helpful resources. - GLASS Studio main menu button
Provides access to the following menu options:- New - Create a new data type project.
- Open - Restore a GLASS Studio project.
- Save - Save the current workspace as a project.
- Switch to Code Editor - Change from the Visual Builder workspace to Code Editor mode.
- Undo / Redo - Undo / redo an action in the GLASS Studio playground. Only applicable in Visual Builder mode.
- Documentation - Link to the GLASS Studio documentation.
- Start tutorial - Launch the tutorial to get a quick walkthrough of the GLASS Studio features and workflow.
- About - Details about the live GLASS Studio build.
- Code pane
Main workspace area in Code Editor mode where you define and write your GLASS custom data type. Supports syntax highlighting for the full suite of GLASS keywords and operators. - Status bar
Displays the following information:- When the GLASS code was last tested.
- Number of matches found for the provided test data.
- Number of syntax errors.
- Line number and column number for the current cursor position.
- Overall character / byte offset for the current cursor position.
- Compile button
Compiles the GLASS code and checks it for syntax errors. Compiler error details can be found in the error notification section of the toolbar. -
Copy to clipboard
 button
Option to copy the written / generated GLASS code to be used as a Custom Data Type in Enterprise Recon. - Indent button and arrow
Click the button to automatically format the GLASS code in the code pane according to the Indent Settings. This action cannot be undone. To open the Indent Settings pane, click on . - Indent Settings
Set your preferred indentation settings and maximum number of characters for each line of your GLASS code. Settings will only take effect when the button is clicked. - Error notifications
Displays the list of compiler and/or syntax errors that were found during compilation of the GLASS code. -
Zoom In / Zoom Out buttons
Zoom controls to increase (Zoom In ) or reduce (Zoom Out ) the viewing size of the scalable playground. Only applicable in Visual Builder mode. -
Leave Feedback

Quick access to the form to share your feedback and suggestions for GLASS Studio. - Open Help Window
Provides access to the following menu options:- Documentation - Click to launch a new tab to access the comprehensive GLASS Studio documentation.
- Contact Support - Click to Submit A Ticket for assistance regarding GLASS Studio.
- Submit Feedback - Access a survey to share your feedback and suggestions for GLASS Studio.
- Test data pane
See Testing GLASS Patterns for more information.
Using the Code Editor
- Launch GLASS Studio and sign in using your Ground Labs
customer portal
credentials, or
click on GLASS Studio at the top left and select New to return to the start screen. -
In the start screen, select New Code Editor Project +.

- Define your GLASS pattern. See GLASS Reference for detailed information on all GLASS operators and/or keywords.
-
Click to verify that the GLASS code is free from syntax errors and can be compiled successfully.
Tip: If compiling results in a Compilation failed message, click on the error notification list next to the zoom in / zoom out buttons to review and fix the compilation error(s). - Test your custom GLASS code. The button will only be enabled if the GLASS code was compiled successfully.
- Once the data type definition is complete, click the
Copy to clipboard
 button to copy the (generated) GLASS code.
 - Go to your Enterprise Recon Master Server instance and create a custom data type for a data type profile (e.g. "ACME Corporation DTP").
- Click on View rules as expression to switch to the Expression Editor.
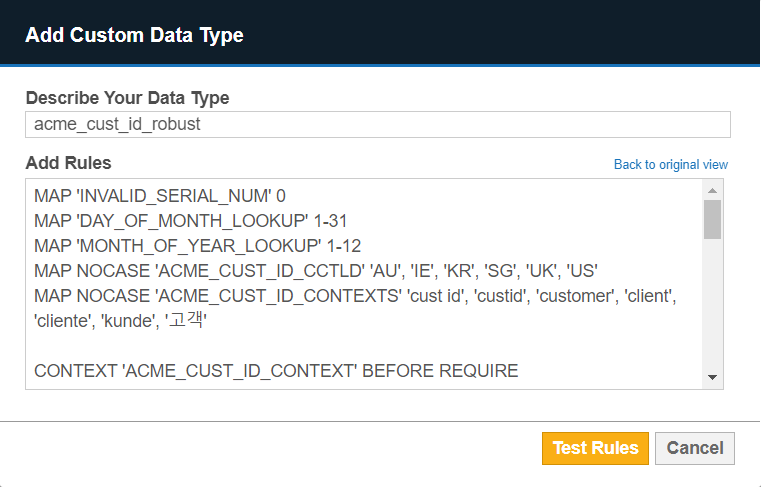
- Enter a descriptive label for the custom data type (e.g. "acme_cust_id_robust") in the Describe Your Data Type field.
- Paste the copied GLASS code into the Add Rules
field and click Test Rules.

- If the GLASS code can be parsed successfully, click Confirm and proceed to save the data type profile.
You can now search for sensitive data that matches your custom data type when you select the newly edited data type profile (e.g. "ACME Corporation DTP").
See Building and Defining GLASS Patterns to learn more about using the GLASS Studio components to build your GLASS data type.
