CONTEXT and APPLY
Overview of the CONTEXT and APPLY Rule
Contextual matching (CONTEXT and APPLY) is an efficient way to specify a set of contextual keywords which when present, determines whether the GLASS engine reports or ignores a potential match.
For example, instruct the GLASS engine to only report
matches for
ACME Corporation's customer ID
if related keywords such as customer or client are found within a certain
range of the customer ID match.
Defining a CONTEXT and APPLY Rule
When applying contextual matching in a GLASS data type, you need to define one or more context rules that:
- Define a set (MAP) of contextual keywords.
-
Specify where the GLASS engine should search for the contextual keywords:
Before (BEFORE), after (AFTER), or around (AROUND) the potential match.
-
Instruct the GLASS engine to
(i) Report the match if at least one context keyword from the MAP appears within a certain proximity of the potential match (REQUIRE), or (ii) Ignore a match if any context keyword from the MAP appears within a certain proximity of the potential match (DENY).
-
(Optional) Specify the range (distance) within which the context keywords must appear from the match.
By default, the GLASS engine searches for contextual keywords within 64 bytes of the potential match.
The generic GLASS syntax for CONTEXT and APPLY is:
MAP [NOCASE|DECOMPOSE] '<namespace>' [NOCASE|DECOMPOSE] '<key 1>', [NOCASE|DECOMPOSE] '<key 2>', ..., [NOCASE|DECOMPOSE] '<key N>'
CONTEXT '<context namespace>' [BEFORE|AFTER|AROUND] [REQUIRE|DENY] '<namespace>' [WITHIN <integer> <range>]
CONTEXT '<context namespace>' [BEFORE|AFTER|AROUND] [REQUIRE|DENY] '<namespace>' [WITHIN <integer> <range>]

<search pattern> APPLY '<context namespace>'
You can define contextual matching rules that apply to a specific expression, or the whole custom GLASS data type pattern.
CONTEXT and APPLY Example 1
ACME Corporation wants to search for any occurrence of regional customer IDs in its storage systems with the following additional requirements:
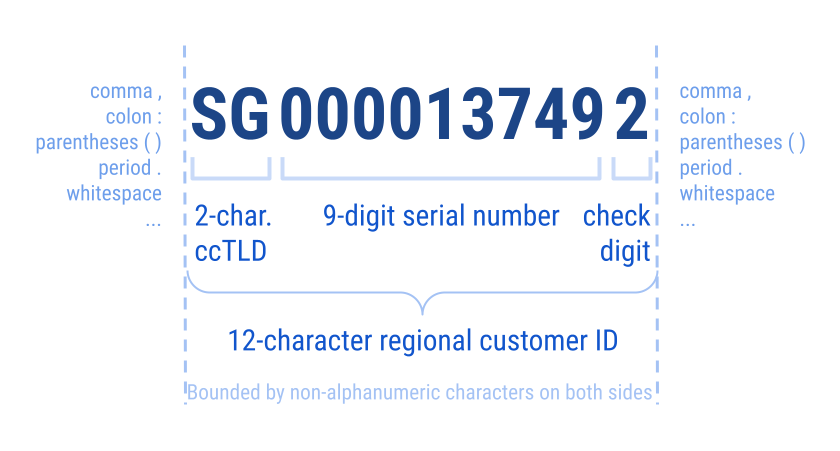
- Regional customer IDs cannot be bounded by alphanumeric characters (e.g. ASCII digits and letters).
- Several keywords (in various supported languages) can commonly be found within
a certain range of a regional customer ID number.
- In English:
cust id,custid,customer - In English and French:
client - In French:
cliente - In German:
kunde - In Korean:
고객
- In English:
Based on the requirements, you can define a custom GLASS data type as below:
# Namespace defining the invalid serial number.
MAP 'INVALID_SERIAL_NUM' 0

# Namespace containing all accepted ccTLD values.
MAP NOCASE 'ACME_CUST_ID_CCTLD' 'AU', 'IE', 'KR', 'SG', 'UK', 'US'

# Namespace containing all contextual keywords.
MAP NOCASE 'ACME_CUST_ID_CONTEXTS' 'cust id', 'custid', 'customer', 'client', 'cliente', 'kunde', '고객'

# Context rules for custom data type.
CONTEXT 'ACME_CUST_ID_CONTEXT' BEFORE REQUIRE 'ACME_CUST_ID_CONTEXTS'

( \
  ( \
    ( \
      GROUP 'ACME_CUST_ID_CCTLD' THEN \
      (RANGE DIGIT TIMES 9 EXCLUDE 'INVALID_SERIAL_NUM') THEN \
      RANGE DIGIT \
    ) CHECK 'PASSPORTMOD10' \
  ) BOUND NONALNUM \
) APPLY 'ACME_CUST_ID_CONTEXT'
Using the GLASS expression above, Line 1, Line 2 and Line 3 will be returned as match locations by the GLASS pattern matching engine.
| 1 | …the customer ID is AU1122334453… |
| 2 | Client number: IE9988776655 |
| 3 | 고객 | KR0000135798 |
| 4 | The customer ID is …<more than 64 bytes between the contextual keyword and expected match>… IE9988776655 |
The regional customer ID number in Line 4, while valid, is not returned as a
match location as the context keyword (e.g. customer) is more than 64 bytes
distance from the ID number.
Example 1 in GLASS Studio Visual Builder Mode
The equivalent configuration in GLASS Studio Visual Builder mode is:
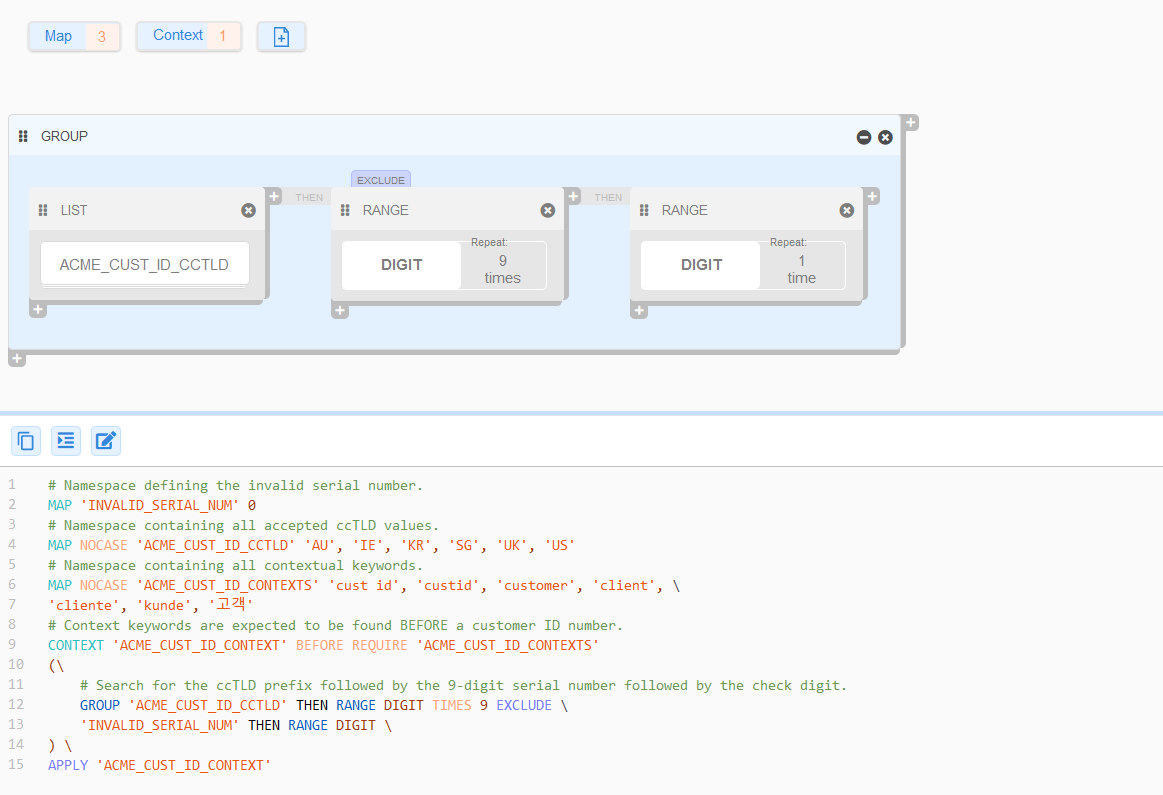
- Group label: ACME_CUST_ID_REGIONAL
- Data type component: LIST (GROUP)
- Data pattern to search for (+ Create Map):
- MAP Name: ACME_CUST_ID_CCTLD
- MAP Entries: 'AU', 'IE', 'KR', 'SG', 'UK', 'US'
- MAP No Case (NOCASE) option: Checked
- Data pattern to search for (+ Create Map):
- Data type component: RANGE
- Data pattern to search for (Select a keyword): DIGIT
- Repeat Character/Octet (TIMES) option: Checked, 9 times
- Exclude (EXCLUDE) rule:
- MAP Name: INVALID_SERIAL_NUM
- MAP Entries : 0
- Data type component: RANGE
- Data pattern to search for (Select a keyword): DIGIT
- Bound (BOUND) rule (Select a keyword): Non-Alnum (NONALNUM) on the Left and Right.
- Check (CHECK) algorithm: PASSPORTMOD10
- Data type component: LIST (GROUP)
- Context (CONTEXT)
- Name: ACME_CUST_ID_CONTEXT
- First rule:
- Type: Require (REQUIRE)
- Position: Before (BEFORE)
- Map (Create new map):
- Map Name: ACME_CUST_ID_CONTEXTS
- Map Entries: 'cust id', 'custid', 'customer', 'client', 'cliente', 'kunde', '고객'
- Map No Case (NOCASE) option: Checked
CONTEXT and APPLY Example 2
# Namespace defining a set of "happy" colors.
MAP 'HAPPY_COLORS' 'Red', 'Green', 'Rainbow'
# Namespace defining a set of "sad" colors.
MAP 'SAD_COLORS' 'Black', 'White'

# First context rule for custom data type. One or more "happy" colors must be present within 64 bytes for a potential match to be reported.
CONTEXT 'CONTEXT_COLORS' BEFORE REQUIRE 'HAPPY_COLORS'
# Second context rule for custom data type. If one or more "sad" colors are present within 64 bytes, the match will be rejected.
CONTEXT 'CONTEXT_COLORS' AROUND DENY 'SAD_COLORS'

WORD 'Flag' APPLY 'CONTEXT_COLORS'
Using the GLASS expression above, Line 1 will be returned as a match location by the GLASS pattern matching engine.
| 1 | Red Flag |
| 2 | <adding filler text to ensure Line 1 and Line 3 are more than 64 bytes apart> |
| 3 | White Flag |
| 4 | Rainbow Flag Black |
The match in Line 3 is rejected as a DENY
context (White) is present.
Even though a REQUIRE context (Rainbow) is
present in Line 4, the match is not reported as a
DENY context (Black) is found within 64 bytes
after the potential match.
Example 2 in GLASS Studio Visual Builder Mode
The equivalent configuration in GLASS Studio Visual Builder mode is:
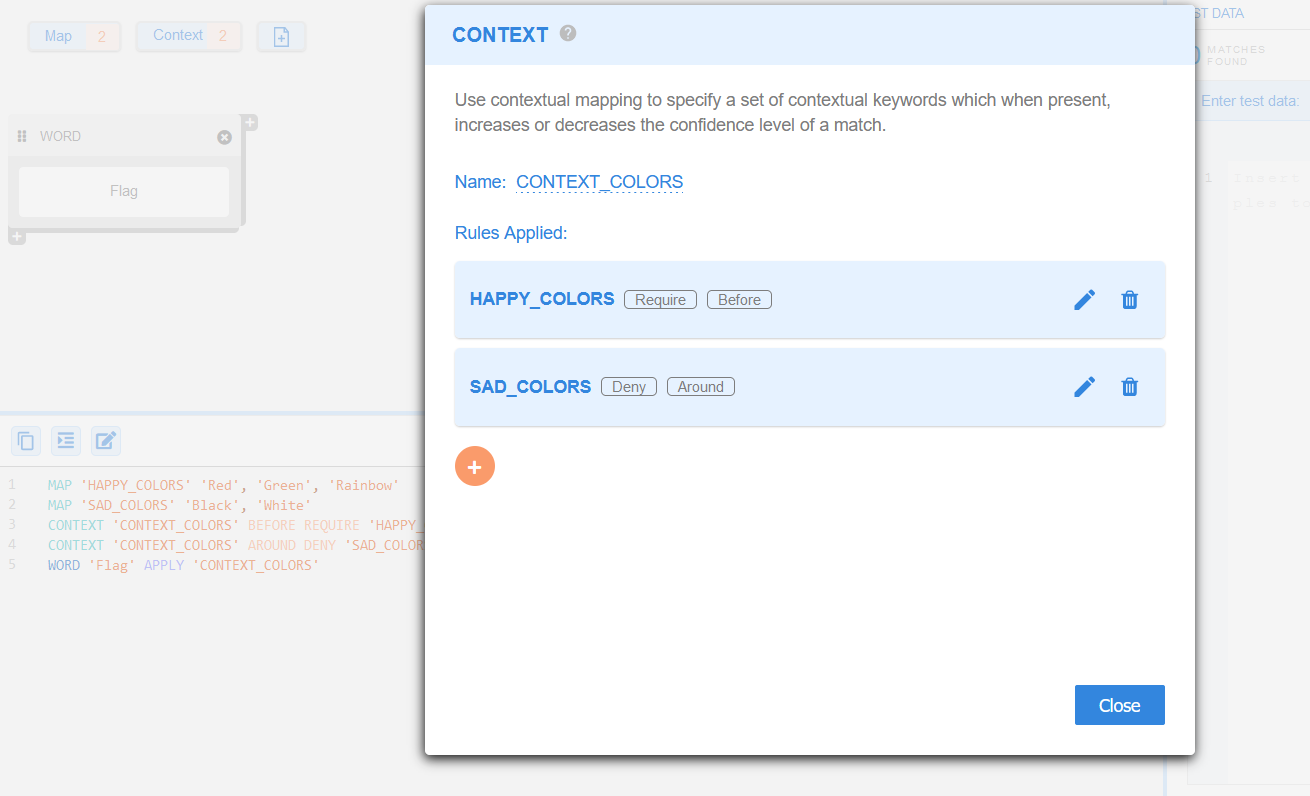
- Data type component: WORD
- Data pattern to search for: Flag
- Context (CONTEXT)
- Name: ACME_CUST_ID_CONTEXT
- First rule:
- Type: Require (REQUIRE)
- Position: Before (BEFORE)
- Map (Create new map):
- Map Name: HAPPY_COLORS
- Map Entries: 'Red', 'Green', 'Rainbow'
- Second rule:
- Type: Deny (DENY)
- Position: Around (AROUND)
- Map (Create new map):
- Map Name: SAD_COLORS
- Map Entries: 'Black', 'White'
Adding a CONTEXT and APPLY Rule
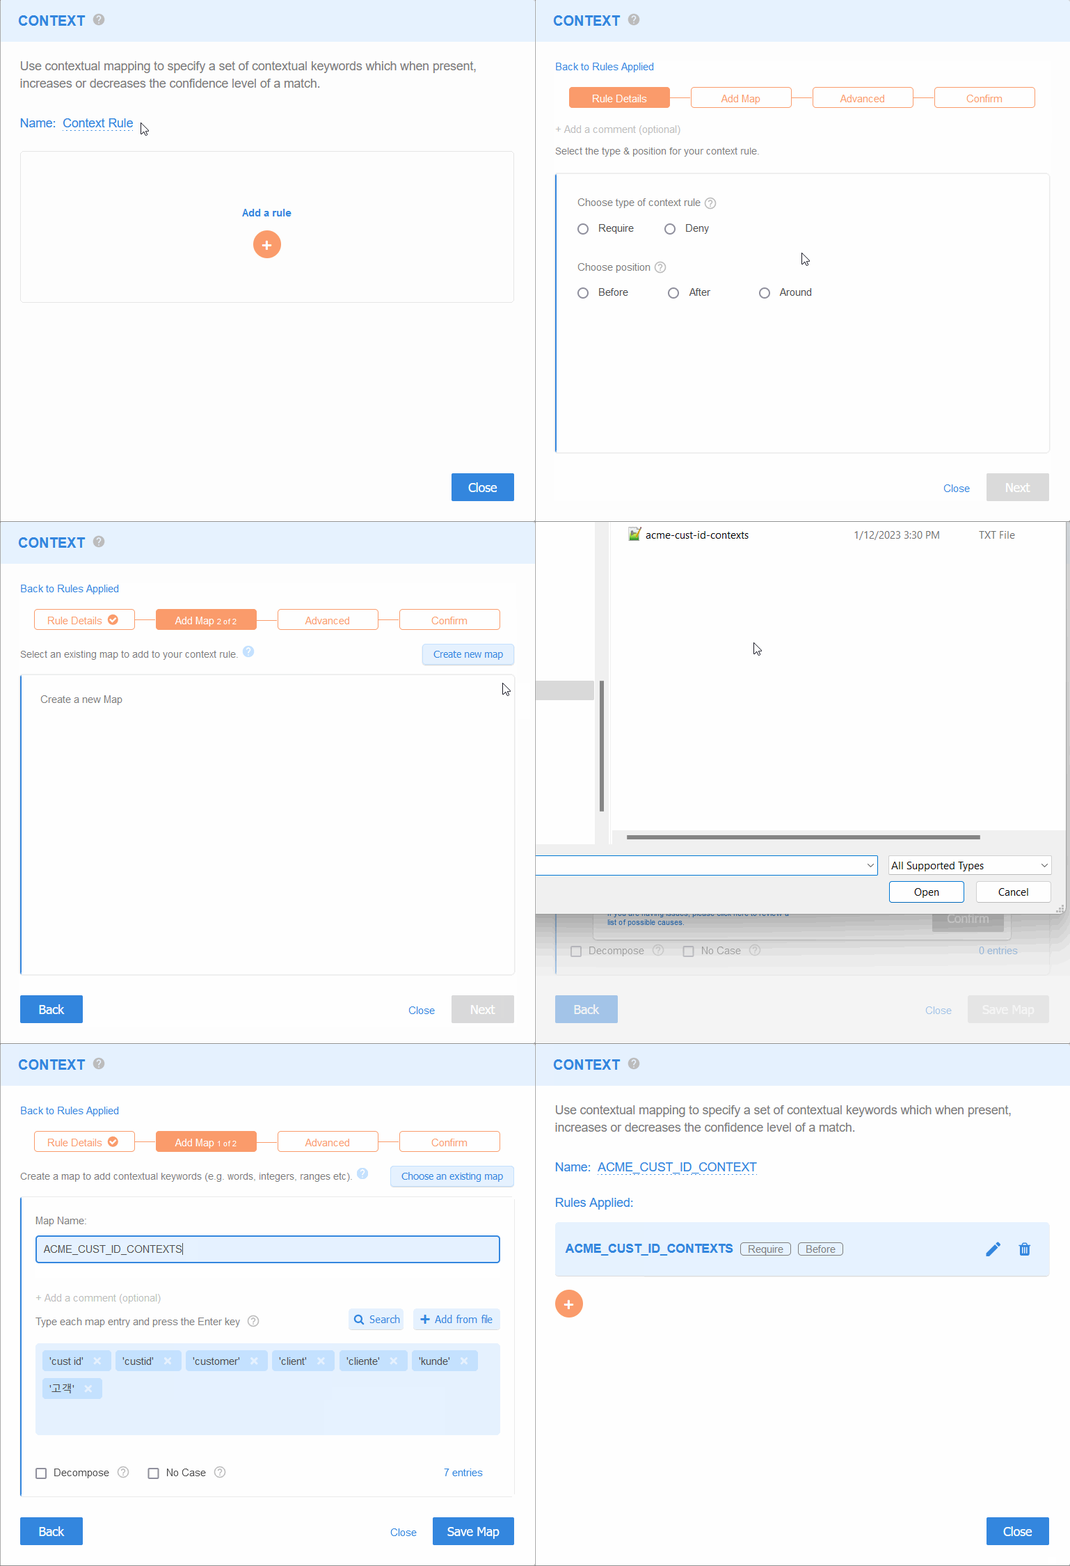
To add a CONTEXT (and APPLY) rule to the data type in GLASS Studio Visual Builder Mode:
- Click on the Context icon in the GLASS Studio playground to open the CONTEXT dialog.
- (Optional) In the CONTEXT dialog, hover over the Name field and click on the Edit icon to assign a meaningful identifier for the CONTEXT operator. Otherwise, keep the default identifier, "Context Rule".
- Click on to add a context rule.
- In the Rule Details page:
-
Select the type of CONTEXT rule to apply.
Require (REQUIRE) - Report the match if at least one context keyword from the MAP appears within a certain proximity of the potential match.
Deny (DENY) - Ignore a match if any context keyword from the MAP appears within a certain proximity of the potential match. -
Define where the GLASS engine should search for the contextual keywords relative to the potential match.
Before (BEFORE) - Search for contextual keywords before a potential match.
After (AFTER)- Search for contextual keywords after a potential match.
Around (AROUND) - Search for contextual keywords before or after a potential match.
-
- Click on Next to continue.
- In the Add Map page, define or select a
MAP containing the list of contextual keywords
to search for.
-
Create new map
Enter a Map Name and the keys associated with the MAP. Click on Save Map.See Adding MAP Namespaces for more information.
-
Choose an existing map
Select from the list of existing MAP namespaces.
-
- Click on Next to continue.
- (Optional) Specify the number of bytes (e.g.
32) within which the context keyword(s) must be found from the potential match. - Click on Next to continue.
- In the Confirm page, review the configured context rule. Click on Confirm to save the context rules.
- (Optional) Repeat Step 3 to Step 12 to add another context rule.
- (Optional) Click Close to discard all changes made and exit the CONTEXT dialog.
Managing CONTEXT and APPLY Rules
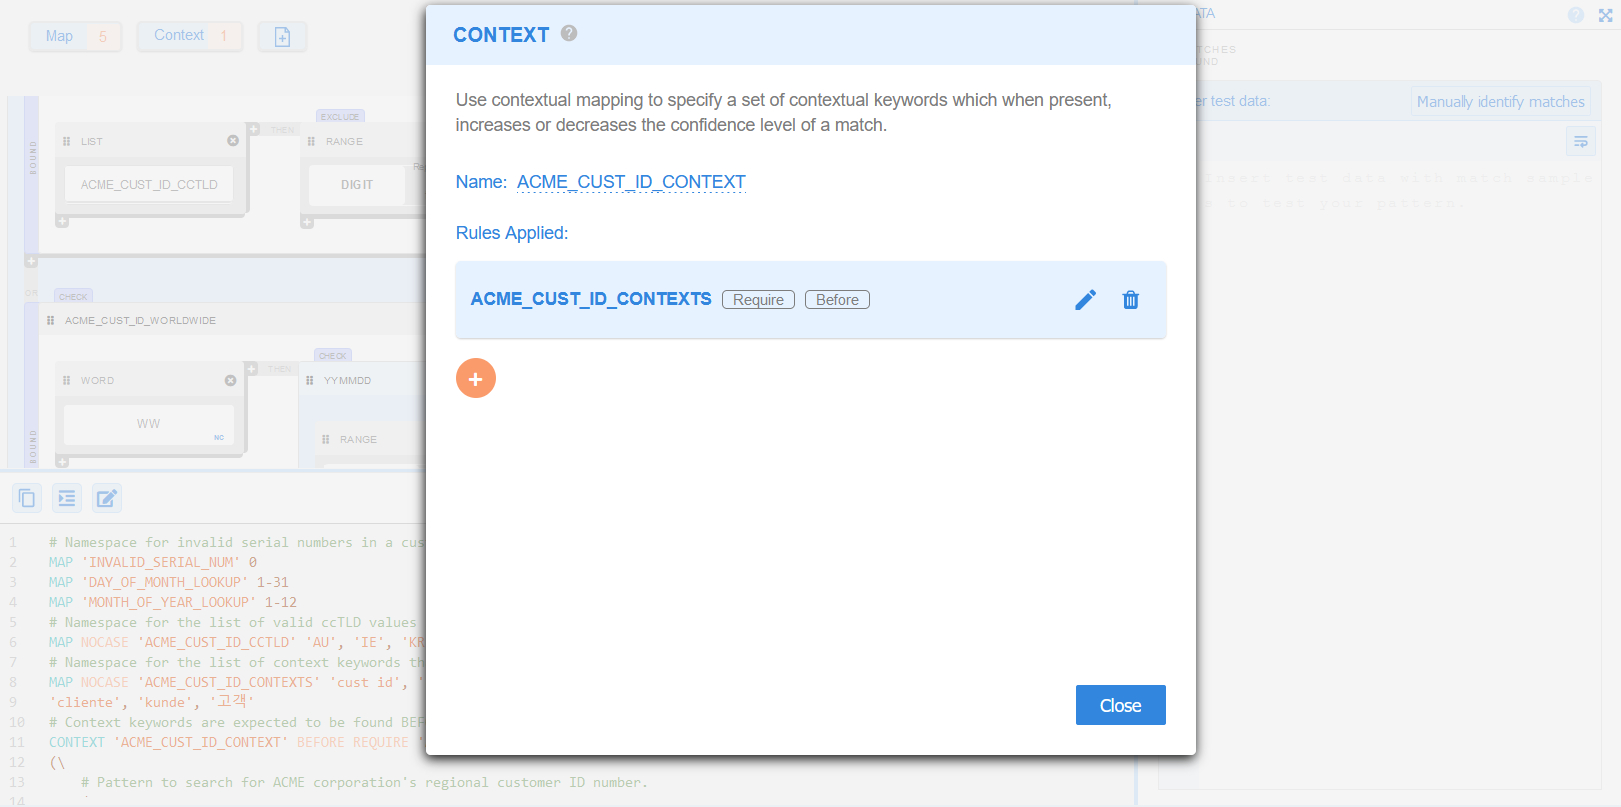
To view all the CONTEXT rules that have been defined for the GLASS Studio data type project, click on the Context icon in the GLASS Studio playground to open the CONTEXT dialog.
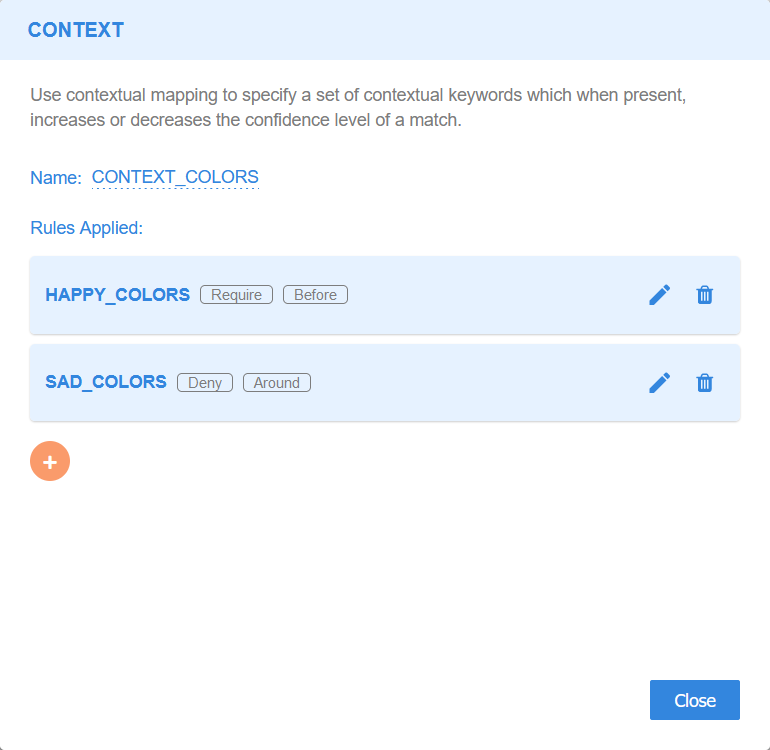
All independent CONTEXT rules are displayed in the Rules Applied pane with the following details:
- [Map Name] - Describes the unique identifier / label for the namespace associated with the context rule.
- [Type] - Indicates if it is a REQUIRE or DENY context rule.
- [Position] - Indicates the position (BEFORE, AFTER, AROUND) where the context keywords are expected to be found from the match to determine if the match should be reported or rejected.
- [Actions] - Option to Edit or Trash the context rule.
Editing CONTEXT and APPLY Rules
You can modify the type, position, and/or select a new MAP namespace to be associated with a CONTEXT rule.
To edit a CONTEXT rule:
- Click on the Context icon in the GLASS Studio playground to open the CONTEXT dialog.
- (Optional) In the Rule Details page, update the type and/or position for the context rule.
- Click on Next to continue.
- (Optional) In the Add Map page, define or select a new MAP containing the list of contextual keywords to search for.
- Click on Next to continue.
- (Optional) Update the number of bytes (e.g.
32) within which the context keyword(s) must be found from the potential match. - In the Confirm page, review the updated context rule. Click on Confirm to save the context rule.
- (Optional) Click Close to discard all changes made and exit the CONTEXT dialog.
Deleting CONTEXT and APPLY Rules
To remove a CONTEXT rule:
- Click on the Context icon in the GLASS Studio playground to open the CONTEXT dialog.
- Click on the Trash icon next to a CONTEXT rule.
- Click on Ok to delete the context rule.